The Premise
Had a conversation discussing a book that I actually studied myself… 10 years ago – a truly venerable publication. It came up that the table creation descriptions at the beginning of the book which I remember using … actually don’t exist.
I’m going to walk you through understanding the descriptions as provided, and a little guide to do the same with random data you find.
The Data
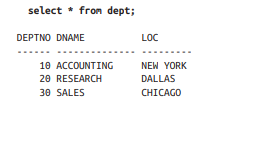
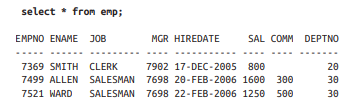
In the book we see the following two sets:
In the dept table, we have a DEPTNO, DNAME, and LOC (department number, department name, and location respectively, database people love shortening things)
In the emp table we have EMPNO, ENAME, JOB, MGR, HIREDATE, SAL, COMM, DEPTNO
Now – depending on if you’re learning SQL Server, SQLite, postgres, MySQL, Snowflake, etc – there’s going to be a slightly different syntax for creating tables, selecting data, and rest – so keep your official documentation open and learn to love it.
For my example I’ll be using SQL Server so here’s the documentation on CREATE TABLE for SQL Server.
Our Process
First, we’ll declare and name our tables, then we’ll add the columns we need, and finally we’ll pick the types we want to use.
This is all boilerplate except for the emp and dept portions respectively – we’re saying create a table called emp and another called dept in the dbo schema with the following columns in parenthesis.
CREATE TABLE dbo.emp();
CREATE TABLE dbo.dept();
Pull out the columns from the dataset and put them in their respective table.
CREATE TABLE dbo.emp(EMPNO, ENAME, JOB, MGR, HIREDATE, SAL, COMM, DEPTNO);
CREATE TABLE dbo.dept(DEPTNO, DNAME, LOC);
Finally, we want to define a data type to act as an appropriate box to place the data.
A well chosen data type maps well to the current and potential values in the column, and the more strict you can be about choosing smaller types or constrained values the more likely you’ll avoid nonsense data. In some cases it can also greatly improve performance.
Now, we’ll start with a very pragmatic approach (for time purposes) and I will leave you with a challenge at the end of the post!
Crack open the SQL Server Data Types as your reference, learning to read the official docs is invaluable.
The main categories are:
- Exact numerics – Exact numbers, use these.
- Unicode character strings – Modern text, use these.
- Approximate numerics – Generally avoid unless you need floating point math.
- Binary strings – You’ll know when you need them.
- Date and time – Useful for common date and time operations and comparisons.
- Other data types – Some useful, some weird, you’ll probably use uniqueidentifier and xml soon enough.
- Character strings – Less common these days but if you have specific types of data it can save you space.
What does that leave us?
CREATE TABLE dbo.emp(EMPNO INT, ENAME NVARCHAR(50), JOB NVARCHAR(50), MGR INT, HIREDATE DATE, SAL INT, COMM INT, DEPTNO INT);
CREATE TABLE dbo.dept(DEPTNO INT, DNAME NVARCHAR(50), LOC NVARCHAR(50));
Importing Data
Before we make this any more complicated, let’s go over simple ways to import data.
There’s MANY data connectors and other methods you can use to INSERT data into a table, but if you’re just starting most of them feel pretty hard to me to bootstrap.
If you’re familiar with these methods then ignore this and move on, but if you don’t have experience using these tools and if you’re dealing with less than a few hundred rows of data here’s a simple way to accomplish your goal that almost anyone can do.
Disclaimer: Don’t this forever folks, there’s many faster and simpler ways once you have more programming chops, but we used to use this all the time in the support world.
This will also break on weird inputs with single quotes (you can replace them) and tabs (when you paste between environments they might think there’s extra columns.)
Crack open Google Sheets or Excel(if you have it) and copy/paste your data from the book/data source into it.
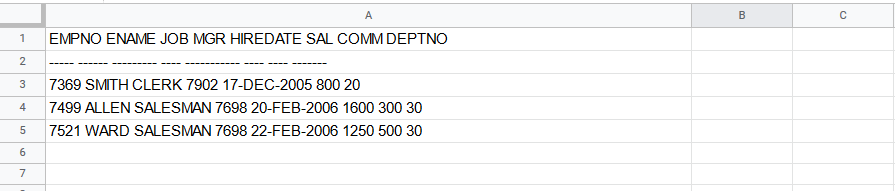
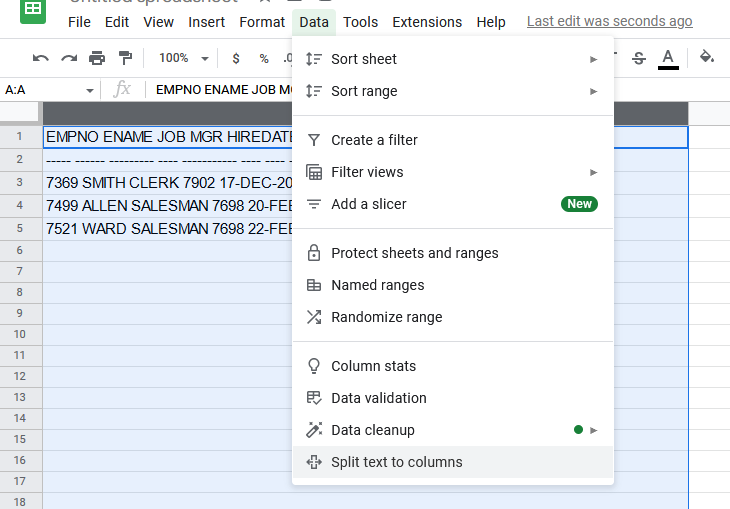
If you look closely you can see that all of our data ended up in Column A – this is bad!
Either use the clipboard icon in the lower right or the data tab to split text to columns. You can find a similar option in Excel.
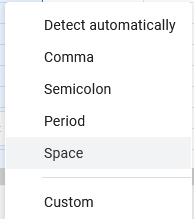

In Excel we’d choose a tab as the separator, but Sheets makes it simpler when choosing what breaks things apart – for this data make sure to choose space.
After the separation, we can see that each piece of data ends up in own column, awesome!
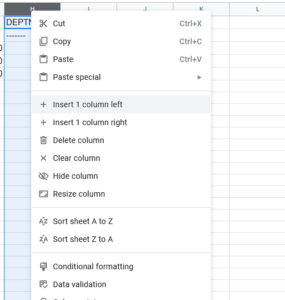
Next, we need to make space between each column for some additional SQL syntax, so right click on each column and insert 1 column left.
When we’re done, go ahead and remove the top two rows:
![]()
This should leave us with just the data.
Next we want to add some code: in the first column and first row you type SELECT ‘
The next (and each) row you copy paste UNION ALL SELECT ‘
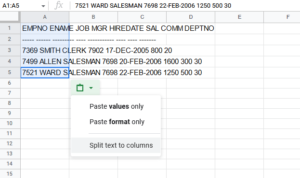
In every other new column you add a quote and a comma, but in both Excel and Sheets if you want to start a cell with a single quote you need to write a double single quote – ”,’ and ” respectively, your cells should look like:![]()
![]()
When you finish your sheet should look like this repeating down as far as you have data.

Now here’s the interesting part – if you select all the data and copy/paste it into SSMS you’ll have a valid SQL statement (with one small flaw!)

So what’s the problem? Well the spreadsheets of the world tend to export tab separated data. So we want to remove the tabs.
How do we do that?
In SQL Sever Management Studio there’s a Find and Replace option with a special little feature – regular expressions.
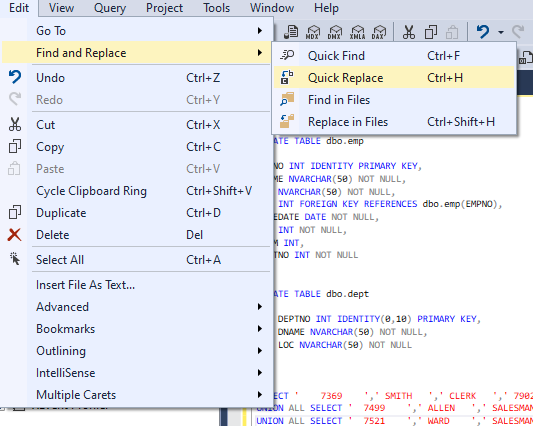
We’re not going to do anything fancy, just click the star (to enable regular expressions) type \t into the find field, and nothing into the replace field. Click the far right Replace All button and watch the text tighten up.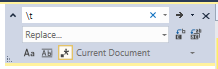


Add your INSERT statement with your table and list of columns to the top of your data and you’re ready to rock!
INSERT dbo.emp(EMPNO, ENAME, JOB, MGR, HIREDATE, SAL, COMM, DEPTNO)
SELECT '7369','SMITH','CLERK','7902','17-Dec-2005','800','20',''
UNION ALL SELECT '7499','ALLEN','SALESMAN','7698','20-Feb-2006','1600','300','30'
UNION ALL SELECT '7521','WARD','SALESMAN','7698','22-Feb-2006','1250','500','30'
I leave it to you to do the same on the dept table, its a lot less columns!
Final thoughts
We could add much more to this table declaration – we probably don’t want to create an employee with no name, or an employee with no department, or delete an entire department accidentally!
The create table syntax is flexible to handle these cases and more – declaring indexes or relationships can make a table much more powerful to model your problem and prevent misuse.
CREATE TABLE dbo.emp
(
  EMPNO INT IDENTITY PRIMARY KEY,
  ENAME NVARCHAR(50) NOT NULL,
  JOB NVARCHAR(50) NOT NULL,
  MGR INT,
  HIREDATE DATE NOT NULL,
  SAL INT NOT NULL,
  COMM INT,
  DEPTNO INT NOT NULL REFERENCES dbo.dept(DEPTNO)
);

CREATE TABLE dbo.dept
(
  DEPTNO INT IDENTITY(0,10) PRIMARY KEY,
  DNAME NVARCHAR(50) NOT NULL,
  LOC NVARCHAR(50) NOT NULL
);
There’s still plenty we could do to make this table declaration better! If you’re still reading and learning and want a starter challenge –
Can you figure out the optimal length for our NVARCHAR fields given the data in the book?
Can you write a SQL query that can tell us how long the fields should be?